
Updated November 2026. We’ve corrected where to find BitLocker in Windows 11, explained that a startup PIN needs an extra policy setting, updated the data breach figures and removed performance claims we couldn’t source.
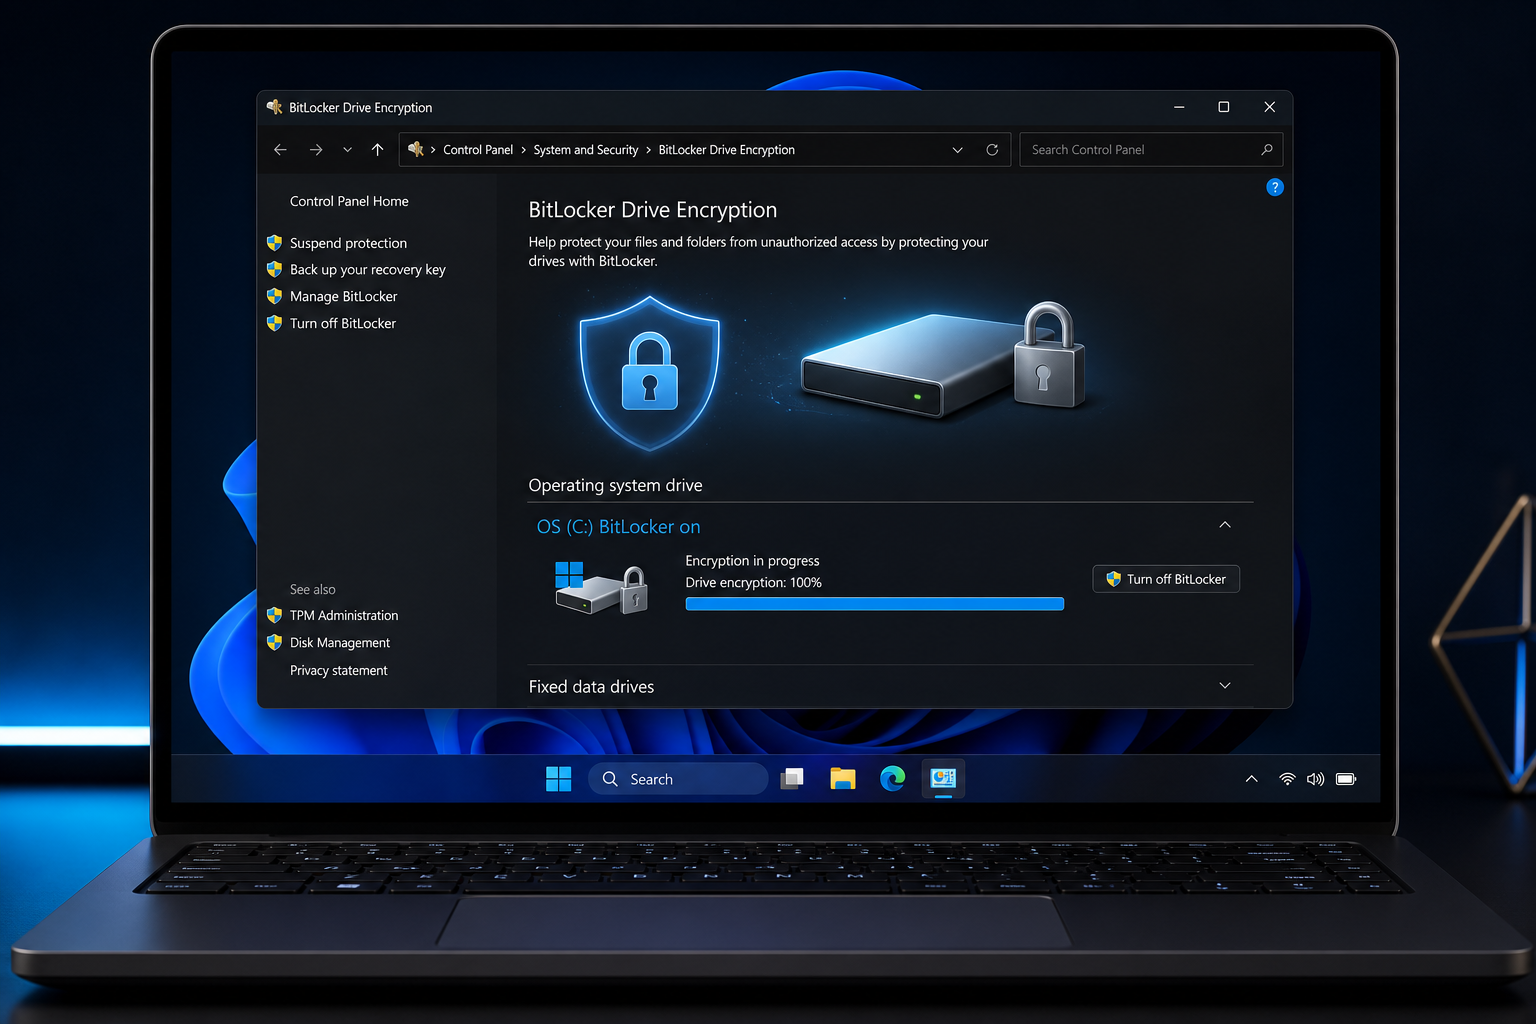
BitLocker encryption scrambles everything on your Windows 11 drive, so if your laptop is lost or stolen, nobody can read your files without your sign-in or the recovery key. On Windows 11 Pro you turn it on in Control Panel > System and Security > BitLocker Drive Encryption, save the recovery key somewhere safe, and let it encrypt in the background. Windows 11 Home has a simpler version called device encryption. This guide covers both, plus the recovery key and the most common problems.
What BitLocker encryption does
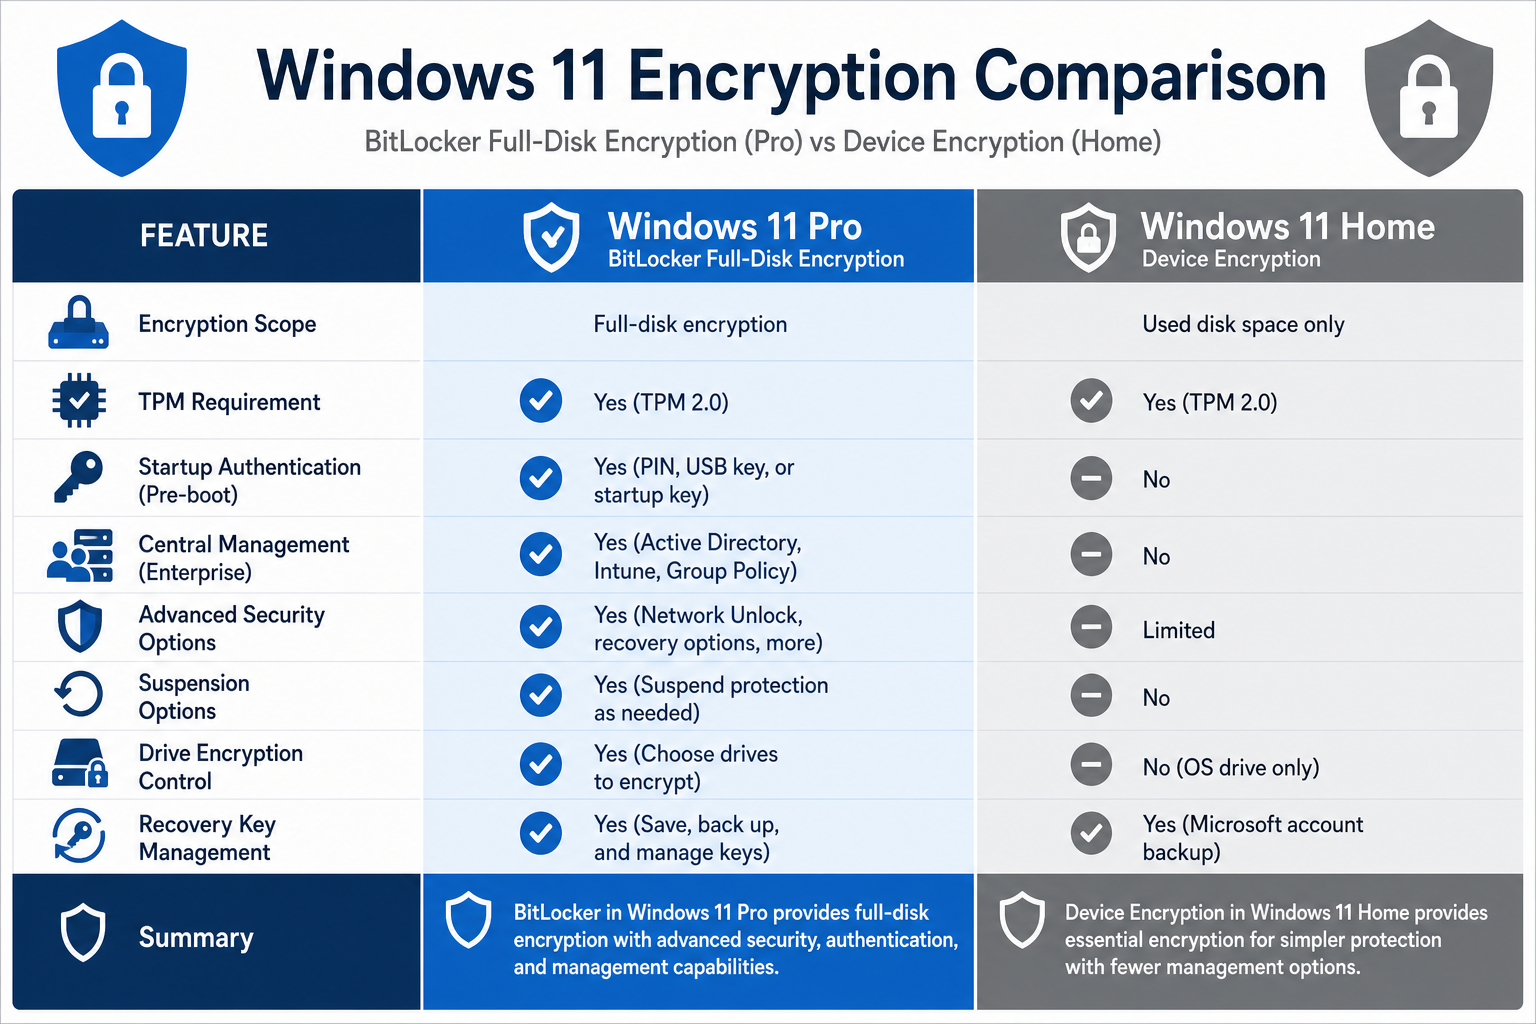
BitLocker is Microsoft’s full-drive encryption, included in Windows 11 Pro, Enterprise and Education. By default it uses XTS-AES with a 128-bit key, and you can choose 256-bit through Group Policy. When the drive is encrypted, someone who removes it and connects it to another computer sees only scrambled data.
The risk is real. IBM’s 2026 Cost of a Data Breach report put the global average cost of a breach at $4.99 million, according to eSecurity Planet. For a person rather than a business, a stolen laptop without encryption can expose saved passwords, documents and photos to anyone who takes the drive out.
BitLocker encryption on Pro vs device encryption on Home
Windows 11 Home doesn’t include the full BitLocker tools. Instead, it has device encryption, which uses the same technology to encrypt the system drive on supported hardware.
- Windows 11 Home (device encryption): encrypts the system drive, with an on/off switch in Settings. The recovery key is saved to your Microsoft account. No startup PIN, no encryption of other drives or USB sticks, and no policy settings.
- Windows 11 Pro, Enterprise and Education (BitLocker): encrypts the system drive, other internal drives and USB drives (BitLocker To Go). It also supports a startup PIN, 256-bit encryption and Group Policy control.
Since Windows 11 24H2, many new installs turn on device encryption automatically when you sign in with a Microsoft account, so your drive may already be encrypted. Check in Settings > Privacy & security > Device encryption, or open Command Prompt as administrator and run manage-bde -status.
If you need full BitLocker on a Home PC, you can upgrade to Pro with a Windows 11 Pro key without reinstalling Windows. Our Windows 11 Home vs Pro comparison explains what else changes.
What you need before BitLocker setup
A TPM
BitLocker stores its keys in the TPM, a security chip in your PC that also checks the PC hasn’t been tampered with before Windows starts. Windows 11 requires TPM 2.0, so any PC that meets Windows 11’s requirements has one. To check, press Windows key + R, type tpm.msc and press Enter. You should see “The TPM is ready for use” and Specification Version 2.0.
UEFI and Secure Boot
BitLocker works best with UEFI firmware and Secure Boot turned on. These are also Windows 11 requirements, so most PCs already use them. You can check in System Information (search for it in Start): look for BIOS Mode “UEFI” and Secure Boot State “On”.
A safe place for the recovery key
Decide before you start where the recovery key will go: your Microsoft account, a USB drive, a printout or, for company PCs, your organisation’s Entra ID. Without it, there’s no way back into an encrypted drive if something goes wrong.
How to turn on BitLocker encryption on Windows 11 Pro
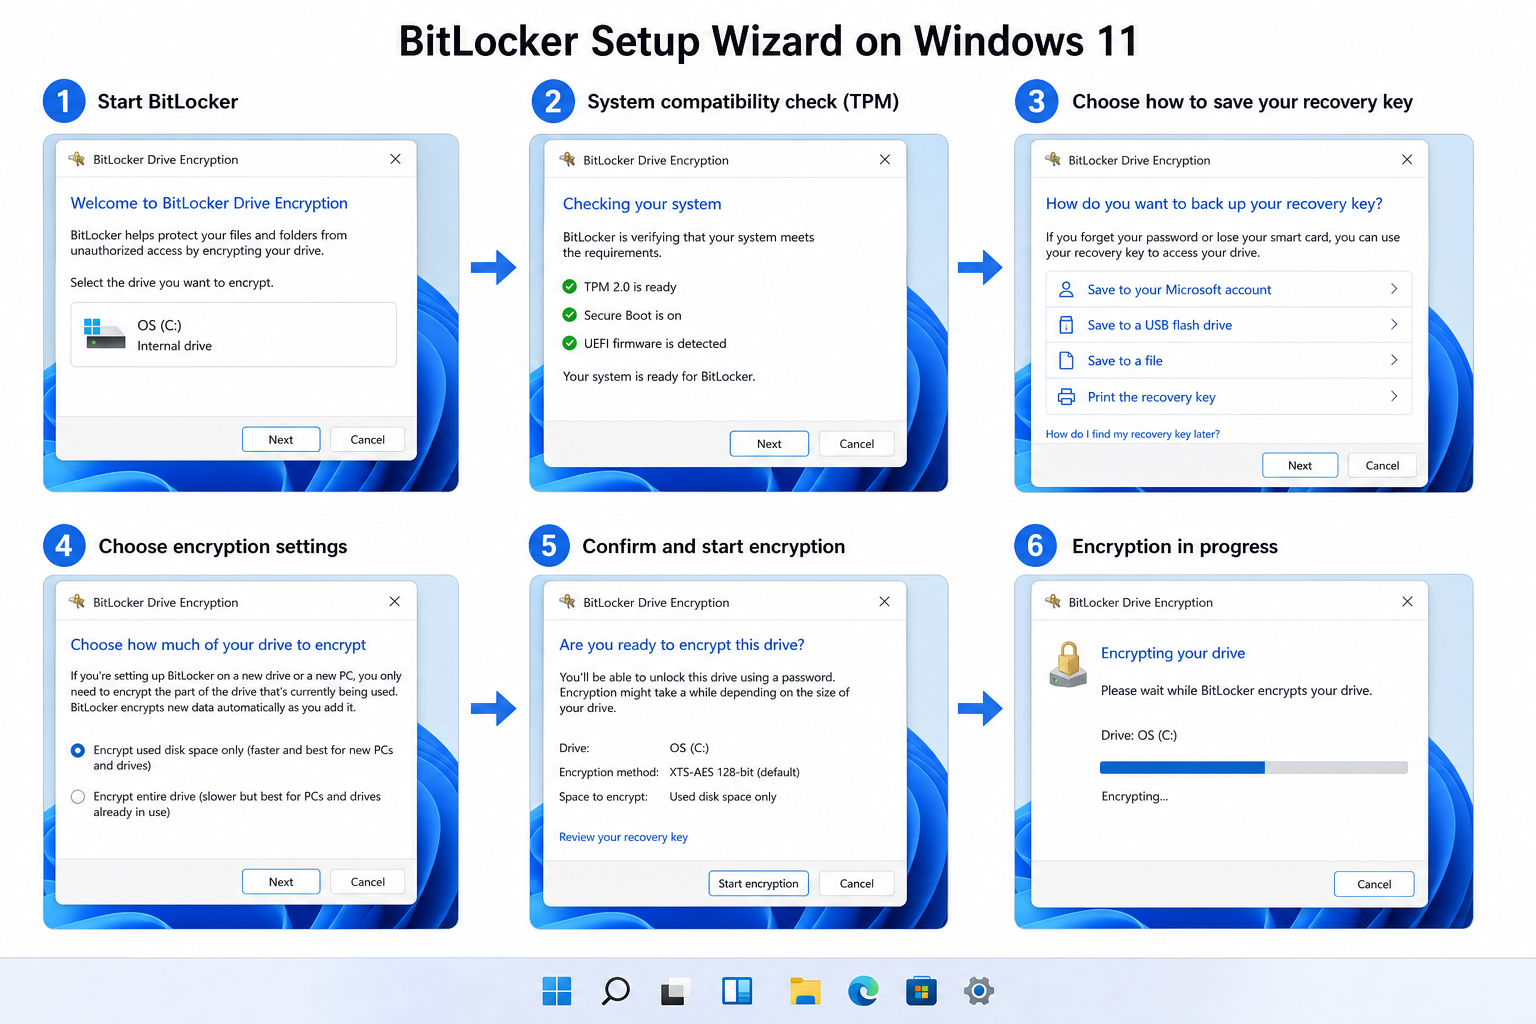
- Open BitLocker. Search Start for Manage BitLocker, or go to Control Panel > System and Security > BitLocker Drive Encryption. Every drive is listed with its status.
- Turn it on. Select Turn on BitLocker next to the drive Windows is on, usually C:.
- Save the recovery key. Choose one or more options: save to your Microsoft account, save to a file on another drive, or print it. Never save it only on the drive you’re encrypting.
- Choose how much to encrypt. Encrypt used disk space only is faster and fine for new PCs. Encrypt entire drive takes longer but also covers space where deleted files used to be, so it’s better for a PC you’ve used for a while.
- Choose the encryption mode. Pick New encryption mode for drives that stay in this PC. Pick Compatible mode for removable drives you might use on older versions of Windows.
- Run the system check. Leave Run BitLocker system check ticked, select Continue, and restart when asked.
After the restart, encryption runs in the background and you can keep using the PC. You can check progress on the BitLocker page in Control Panel, or with manage-bde -status. How long it takes depends on the drive’s size and speed, and on how much data is on it.
Adding a startup PIN to BitLocker encryption
By default, BitLocker on the system drive unlocks automatically using the TPM, so you won’t be asked to choose a PIN during setup. A PIN adds protection, because nobody can start the PC without it. To add one on Windows 11 Pro:
- Run
gpedit.mscand go to Computer Configuration > Administrative Templates > Windows Components > BitLocker Drive Encryption > Operating System Drives. - Open Require additional authentication at startup, set it to Enabled and set Configure TPM startup PIN to Allow startup PIN with TPM.
- Open Command Prompt as administrator and run
manage-bde -protectors -add C: -TPMAndPIN, then enter your PIN.
From then on, you type the PIN each time the PC starts, before Windows loads. Microsoft’s guide to configuring BitLocker lists the other policy options.
Managing your recovery key after BitLocker setup
Finding the key in your Microsoft account
Go to account.microsoft.com/devices/recoverykey on any device and sign in with the account you use on the PC. Each key is listed with a device name and a key ID. Match the key ID shown on the blue recovery screen and type in the 48-digit key.
Making another backup
On the BitLocker page in Control Panel, select Back up your recovery key next to the drive. You can save another copy at any time while Windows is unlocked.
What makes BitLocker ask for the key
BitLocker asks for the recovery key when something changes in how the PC starts. Common triggers are:
- A BIOS or UEFI firmware update
- Changing the boot order or Secure Boot settings
- Booting with a USB drive or other device connected
- Replacing the motherboard or moving the drive to another PC
- Repeated wrong PINs
Before a firmware update, you can pause protection in Control Panel with Suspend protection. It turns back on automatically after the next restart. If you’re locked out at the recovery screen, our guide to fixing a Windows account lockout explains where else to look for the key.
Common Windows 11 encryption problems
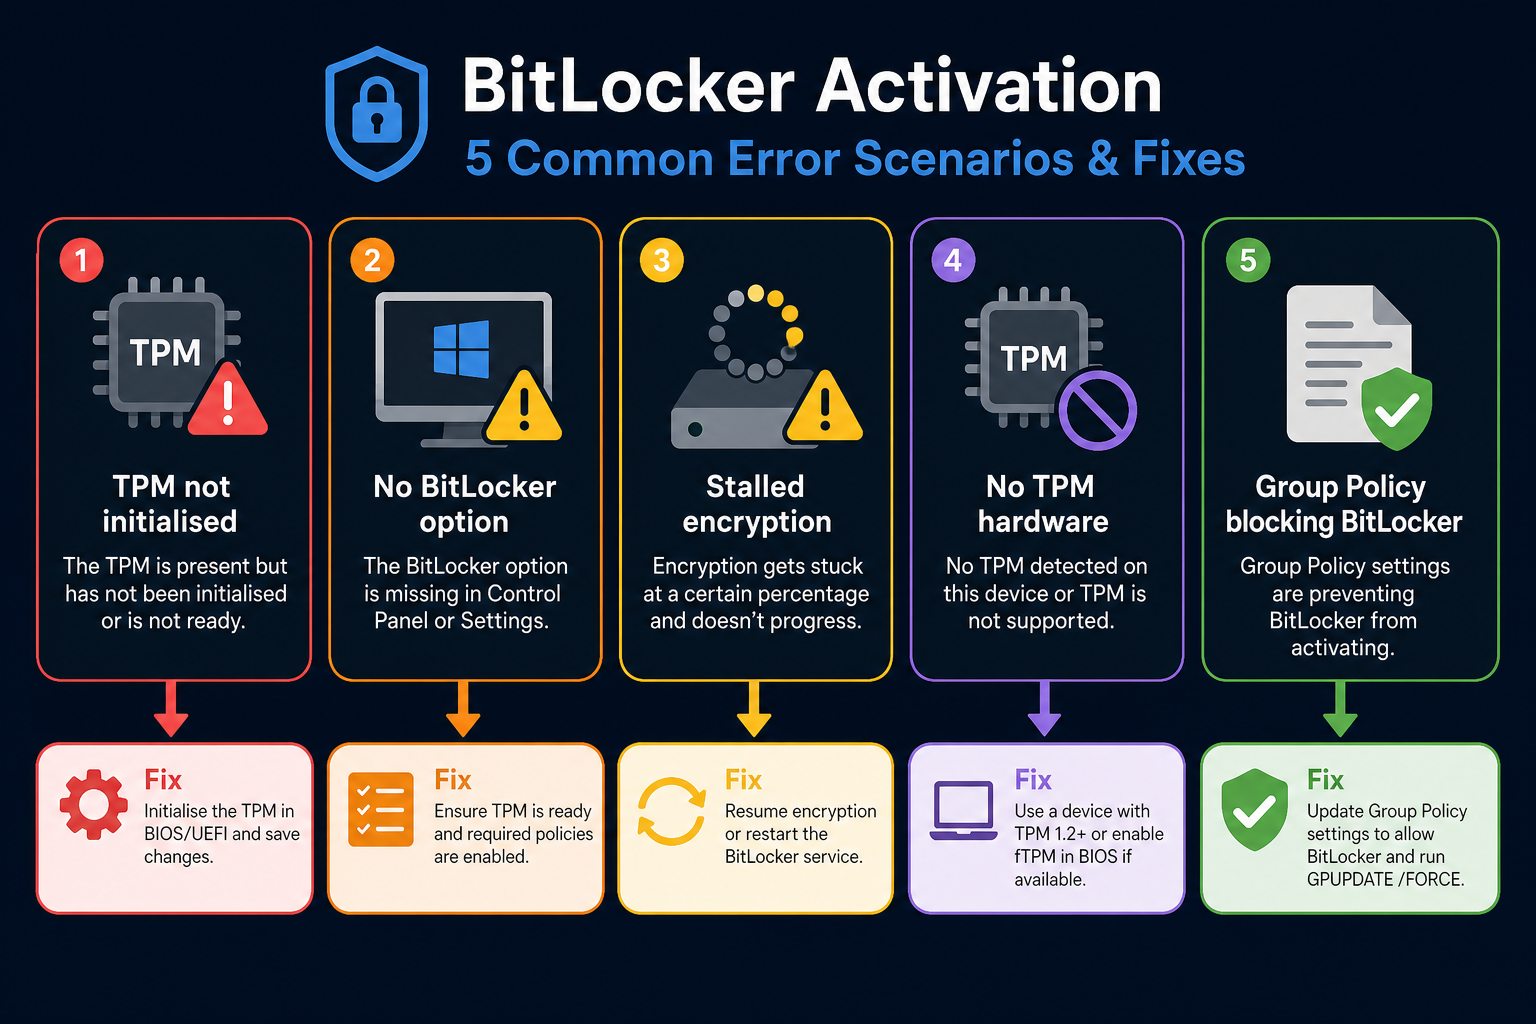
There’s no BitLocker in Control Panel
You’re on Windows 11 Home. Use device encryption in Settings instead, or upgrade to Pro for full BitLocker.
Device encryption is missing on Home
Your PC may not support it, often because of a hardware or firmware setting. Open System Information as administrator and look at Automatic Device Encryption Support, which lists the reasons.
“The TPM is not ready” or BitLocker can’t start
Restart into your PC’s firmware settings and check that the TPM is enabled. It may be called TPM, PTT on Intel or fTPM on AMD. Then run tpm.msc again.
Encryption seems stuck
Check progress with manage-bde -status. Encryption keeps going after restarts, so just leave the PC on and plugged in.
Does Windows 11 encryption slow your PC down?
On most modern PCs you won’t notice it in everyday use. Current processors have built-in instructions for AES encryption, so the extra work is small. You’re more likely to notice a difference on old PCs with hard drives during large file copies. For a laptop that leaves the house, that’s a fair trade for knowing a lost device won’t expose your files.
If you’re planning a clean reinstall later, back up the recovery key first. Our Windows 11 clean install guide covers the other checks to do before you wipe a drive.
FAQ
Does Windows 11 Home have BitLocker?
Not full BitLocker. Home has device encryption on supported PCs, which encrypts the system drive and saves the recovery key to your Microsoft account. Full BitLocker is in Windows 11 Pro, Enterprise and Education.
Why didn’t BitLocker setup ask me for a PIN?
Because by default the system drive unlocks with the TPM alone. To use a PIN, enable “Require additional authentication at startup” in Group Policy and add a TPM and PIN protector with manage-bde.
Can I use BitLocker without a TPM?
Yes, on Pro, if you enable “Allow BitLocker without a compatible TPM” in the same Group Policy setting. You’ll then need a password or USB key every time the PC starts. Almost every Windows 11 PC has a TPM, so this is rarely needed.
Where is my BitLocker recovery key?
Usually at account.microsoft.com/devices/recoverykey, if you signed in with a Microsoft account. Otherwise, check the file or printout you saved during setup, or ask your IT team if it’s a work PC.
Is my drive already encrypted?
Possibly. Many Windows 11 PCs turn on device encryption automatically. Run manage-bde -status in an administrator Command Prompt, or check Settings > Privacy & security > Device encryption.
